The Product Tree Game: Our Favorite Way To Prioritize Features
The Product Tree game is a feature prioritization technique developed by our friend Luke Hohmann for his book Innovation Games: Creating Breakthrough Products Through Collaborative Play.
We’re sharing it with you because it’s a productive way to work out priorities as a team, and it’s a really helpful method for mapping development. Who said product management couldn’t be fun?
One of your biggest jobs as a product manager is to translate and prioritize what feels like a million inputs flying in from across the company into just one cohesive product roadmap. To help you with this, we want to share one of our favorite feature prioritization frameworks with you.

During this game, everyone gets a chance to bring up the priorities they feel are important for the future of the product. But which priorities will win?
You’ll want to set aside an entire morning or afternoon for this riveting afternoon of discussion, debate, and feature prioritization.
The more people you involve in the process, the better the understanding will be across the board. A good mix of internal stakeholders and active users will provide you with more valuable insights than just getting your product teams together in isolation.
Below you’ll find our easy how-to guide on running your own Product Tree session using this fun visual tool. We’ve also got a brilliant eBook about all of the most important prioritization frameworks for product managers. Just click the banner below to get your copy.

How to run your Product Tree Game session
What you’ll need:
- The Product Tree template (download below)
- Post-it notes (leaf-shaped Post-its are perfect)
- Sharpies
- A whole afternoon
- Coffee? Can’t hurt!
Step 1: Print our Product Tree template
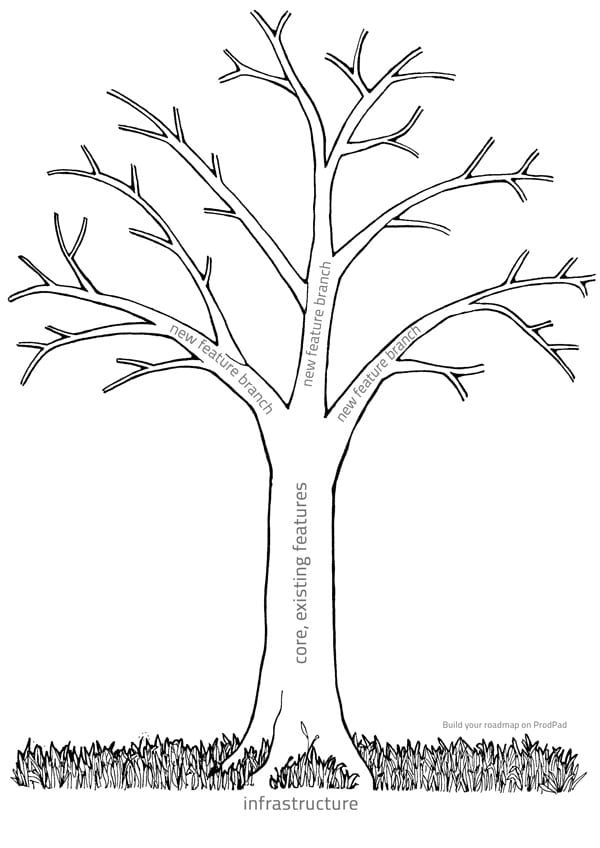
The Product Tree is what you’ll use to run your session. Get our free Product Tree template here, or draw your own out on a big whiteboard.
Each Product Tree consists of four elements:
- The trunk represents the core features already in your products.
- The branches are feature branches. Optionally, you can increase the thickness of single branches that are more important.
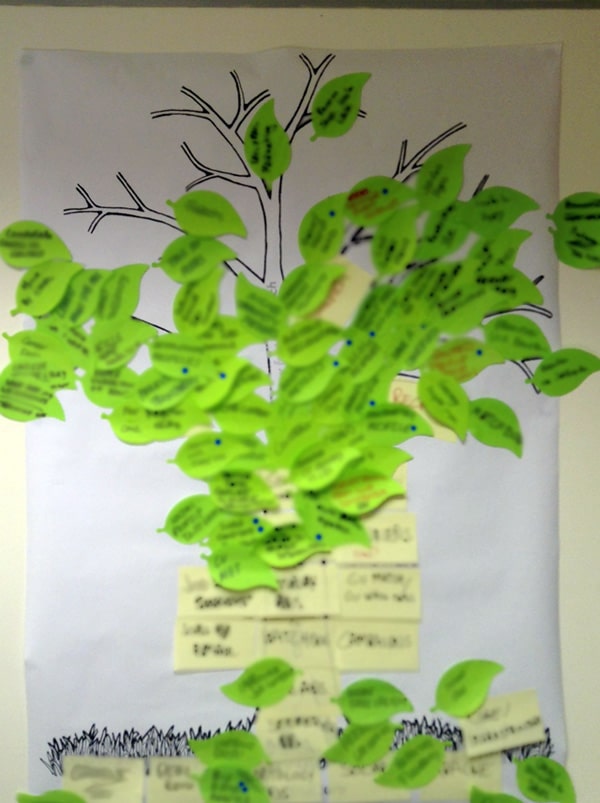
- The leaves are individual features that the workshop participants will place on the branches. The closer the leaves are to the trunk, the closer they are to being delivered.
- The roots represent the infrastructure and technical requirements that support your product. As with any tree, the bigger it gets, the more support it needs from its roots – so remember your technology as you expand your feature list.

That said, how you fill out this tree depends on the kind of product you want to build. If you want to focus on one area, your product could be the roots, and the area you’re focusing on would be the trunk.
Or, if you’re running a platform with multiple products, the platform itself could be the trunk, and the main branches would represent each of your products.
Whatever the scale of your approach, you’ll need to list out the main areas of your product and label the branches of your tree accordingly. If your product areas have chunky bits of functionality or features within them, you could add those to the stubs of the branches.
Step 2: Prepare your leaves
Print out all the features you already have in your product, or want to add to your product. Or, write them down on Post-it notes. Also, make sure to have plenty of empty Post-its at hand for adding new ideas!
Don’t worry about adding all your existing features, because if you have a feature-rich product, you’ll be there all day.
Step 3: Get your group together
Anyone can play this game. The more kinds of stakeholders you involve, the richer the output. It becomes especially interesting if you get customers involved in placing new features on the branches according to which they would most like to see in your product.
If you have more than 10 people joining in, prepare multiple sets of trees and leaves – ideally, you will have 4-10 people working on one single tree. This includes one observer per tree, whose role it is to ask the participants to clarify what they mean if there’s anything ambiguous on the tree.
Step 4: Put the leaves on the tree
Ask everyone to write their feature ideas on the (hopefully) leaf-shaped Post-it notes, then get them to place the Post-its onto the tree wherever they think they should go.
The further away from the trunk they are, the more into the future you’re planning. Leaves closer to the trunk are closer to deployment, while the canopy of the tree is more about long-term growth.
Step 5: Prune your Product Tree

Now the fun begins – like green-thumbed gardeners, get cracking on pruning the tree!
Pruning in this case doesn’t always mean outright cutting things from your tree, though. Really, ‘pruning the Product Tree’ is more about assessing what you put on your tree, and then collaboratively reorganizing it.
Moving features around or adjusting the thickness of a branch is just as valid as cutting an impractical idea (though you’ll still want to do that – but make sure hang on to them for the review phase).
Together as a team, you’ll need to talk through the placement of each leaf, and work on refining where they sit on the tree as a whole. This means that you need to identify and remove branches, leaves, or even roots that are hindering long-term growth or putting roadblocks in the path of your solutions.
Once your team has put together their tree, they need to assess each leaf’s importance. How much value does it adds for your customers? How does it align with your product vision? And how much effort it would take to implement or to maintain? These are some of the questions you’ll want to throw out about each idea.
Consider the importance and impact to the customer, the relevance to your product vision, the effort required to bring it to market, and the impact on your business goals and product strategy.
Tips for having a successful Product Tree workshop
Here are some pointers on how to have a productive and fun Product Tree pruning session:
- Personalize the tree to stimulate creativity. For instance, participants can add their own little markers to their ideas, or draw hearts around the features they really love.
- Remember the significance of where leaves are placed. The closer the leaves are to the trunk, the more near-term they are. Leaves closest to the trunk are existing features, while leaves on the outer edges of your canopy represent the long-term future.
- Don’t hesitate to use lines to show links or dependencies between features. Though try not to end up looking like Charlie in It’s Always Sunny.
- Don’t worry too much if the tree becomes unbalanced. Usually, the group participants or the observer will bring this up naturally.
- Take pictures of the development of the tree(s) – this is useful for the review process.
Step 6: Present and review internally
At the end of the session, present your tree (or multiple trees if you worked in groups). Encourage everyone to ask questions and discuss. Often, more ideas will come up during this process, or leaves will be shuffled around.
Once you’re all packed up, take your product tree and the pictures you took and compare them against your current product roadmap. Useful questions to ask are:
- Which “prepared features” got pruned? Especially if you’re working directly with customers, you might find that a much-loved feature is actually dispensable in the eyes of the user.
- Do the trees retain their general shape? If you’re seeing an obvious imbalance – such as lots of leaves on one branch – this could be a signal that your users aren’t aware of (perception problem) or interested in (product/market fit problem) a whole feature set in your product.
- Are you growing your product fast enough? If there are a lot of leaves close to the trunk, you may not be releasing new features fast enough; whereas lots of leaves on the outside shows that they’re looking for great things in the future.
- What does your root system need to look like? If your customers are changing aspects of your infrastructure, it’s likely of critical significance to them to establish trust in the longevity of your product.
At ProdPad we find the Product Tree game is a great way to dig into feature prioritization. Don’t forget to check out our free prioritization framework eBook, and if you need even more detail on the best way to run a Product Tree session, take a look at our free manual here. They’re both fantastic resources to help you with creating your lean product roadmap.

Hi Janna,
You’re doing such a good work with the articles, ProductTank, MindTheProduct and ProdPad. Congratulations and thanks for that!
I couldn’t get right the dynamics of the phase to prune the tree. After pinning the leaves the same participants has to prune the tree together?
Thanks in advance,
Jayr Motta
Hi Jayr, thanks for the kind words!
Each time you do the product tree exercise, you’ll find different dynamics in the group. It all depends on the team, the state of the product, etc. The entire exercise is collaborative, so the team who helps put up the new leaves will be there to help prune it at the same time. If you haven’t been pruning at the same time as pinning, that’s fine – take a step back and look at the tree as a whole with the team, and ask questions about whether they think there’s anything that looks out of balance, or whether the items near the trunk are the most important to do next or whether other things should be tackled next… all of this will help you get a sense of whether everything’s in the right place. You might find that you don’t need to remove much at all, which is fine! Just use the exercise as a way to get everyone on board with the sorts of things you’re planning to build for the product in order to reach the product vision.
I hope that helps!
All the best,
Janna
Hi Janna,
Great post – some questions as I was wondering about using it in our next ideation/prioritization:
1. When explaining the goal of this exercise if doing with stakeholders/customers, isnt there a risk where one would want their requirements and so would put it closer to the trunk or not remove it or move it further out?
2. Do we wait till the tree is unbalanced and then ask to balance it by either moving some features to another branch or just removing it?
3. Any tips on interpreting the final tree outcome? eg:
a. Too much or too crowd in one of the branches
b. Could you share some of the common scenarios you have seen play out from the final output?
Thanks,
Bosky
Hey Bosky, thanks for stopping by! You’ve got some great questions:
1. Part of the magic of this exercise is that your stakeholders will have to negotiate and defend their positions amongst themselves. So while, in a typical day-to-day conversation, it’s them trying to convince *you* that their pet feature is the best thing and should go first (and inevitably, you having to tell them no for any number of valid reasons), in the product tree exercise, they have to work out the order based on the input and opinions of the rest of your crew. Your job in this exercise is to guide the conversation and prevent anyone from taking over or shying away from it, but for the most part, it’s a chance to get the team on board with the bigger picture, not just what will move their own KPIs.
2. An unbalanced tree isn’t necessarily bad thing… what it will do is open up the conversation about *why* it’s unbalanced. If you see it swaying, prompt the crew to pitch in ideas on why it’s not important to them. Is it because they’ve gotten really excited about one area and forgot about another area (in which case, spend some time in that other branch to flesh out the thinking there)? Or is it because it’s actually not all that important to the team (in which case, maybe you should adjust the direction your company is going to make sure you’re working on stuff for your most important users or areas)? Your tree will look different than any other out there, but look for patterns or inbalances to get a feel for what it means to your wider product vision.
3. The final tree represents one brainstorm, and shouldn’t be taken literally… after all, if you did this same exercise in a week, you’d likely end up with a slightly different tree. In general though, you can interpret the leaves nearest the trunk as your current/immediate term initiatives, the leaves in the middle as the next set of initiatives, and the leaves in the canopy as the future term. Each leaf will likely need some clean up to make sure it’s the right ‘size’ and clearly described, which might involve some grouping and pruning before it translates into a final roadmap. In the final roadmap format, you might find it helpful to use tags to represent the different branches or areas that each leaf represented, and colors to represent what KPI they represented (ie. green for revenue initiatives, blue for user growth initiatives, etc.).
At the end of the day, the roadmap is a strategic communication document, and so the final format should be flexible and changeable based on what needs to be communicated to the team and other stakeholders. The product tree is just one great way (my favorite) to get team input and buy-in for what will eventually become the updated roadmap.
This is brilliant – thank you!
Hi Janna,
Thank you for this, I literally found your video on YouTube and here I am!
I will like you to please suggest the best way my fully remote team can play this game. My company does not have a roadmap yet and I will like to use this game to set the pace.
Cheers!
Greg
Hey Greg, glad you stopped by!
There are some great whiteboarding tools you can use to play the Product Tree game these days. Miro or Figjam are a couple examples. One way to do it is to upload an image of the tree as the background, and then allow people to add their post-it notes to the digital board over top of the tree… much like you’d do with the physical whiteboard version!