Tech Tutorial: OAuth in JIRA

As we announced recently, we’ve integrated ProdPad with JIRA. This allows you to push ideas and user stories across to JIRA, creating a link back and forth between the two apps.
In the process of building this, I found the documentation for authentication in JIRA to be… let’s say lacking. It was a process of trial and error (and finally stumbling across this helpful page) that helped me get the OAuth integration for JIRA up and working.
Instead of keeping this to ourselves, I’ve decided to write a little tutorial to help others trying to setup JIRA OAuth. This tutorial applies to both the hosted “OnDemand” version and standalone installations. If you’re looking to build your own JIRA integration, we hope this helps!
Understanding JIRA OAuth
The key to understanding JIRA OAuth setup is that:
a. There is no central repository of consumer applications (unlike say Twitter or Trello), and
b. JIRA uses RSA encryption as part of its OAuth setup.
Before you can do the authentication, you have to set up a consumer app in the JIRA install. Note: each JIRA instance that you are connecting to will need a consumer app to be set up, whether that JIRA instance is hosted or standalone.
JIRA calls the OAuth consumer app “Application Link”, which requires RSA keys for signing the API calls. Before you can authenticate or communicate with a JIRA instance, you need to set up this “Application Link” and the RSA keys to be used for signing.
Set up a Consumer App in JIRA
To set up the consumer app, do the following (Note: You will need to have administrator access to your JIRA account):
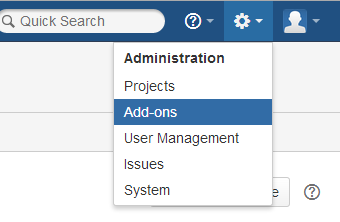
1a. Log in to JIRA and, in the Administration list (click on the cog icon in the top right), head to Add-ons. (Figure 1a)
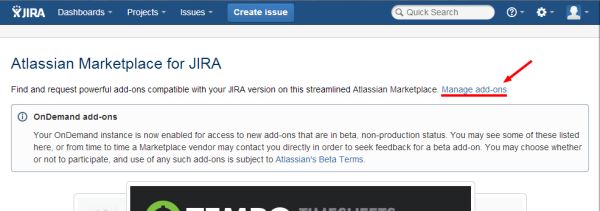
1b. Click on Manage add-ons. (Figure 1b)
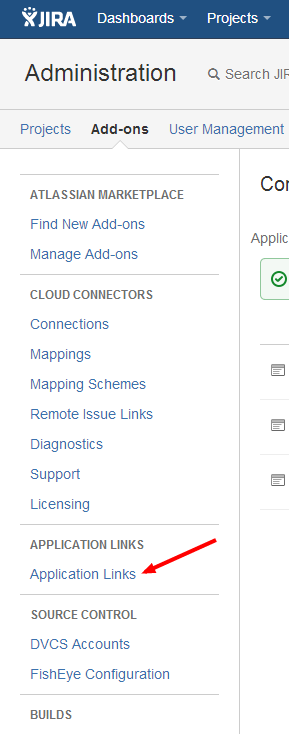
2. Click on Application Links. (Figure 2)
3. Enter https://app.prodpad.com into the field at the top of the “Configure Applications Link” page, and click Create new link. (Figure 3)
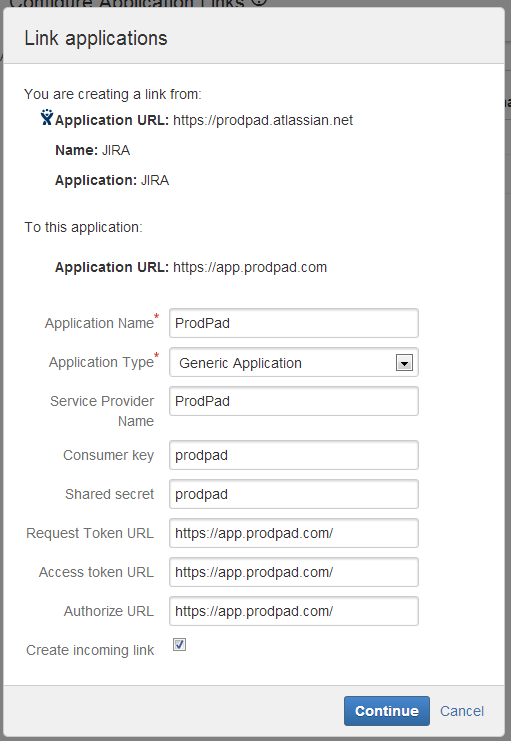
4. In the “Link Applications” modal window, enter the name of your app, ProdPad and select Generic Application from the “Application Type” dropdown. Repeat the name of the app, ProdPad, for the “Service Provider Name”, and enter prodpad for the “Consumer key” and the “Shared secret”. For the “Request Token URL”, “Access token URL” and the “Authorize URL”, enter https://app.prodpad.com. Check the checkbox for “Create incoming link”.
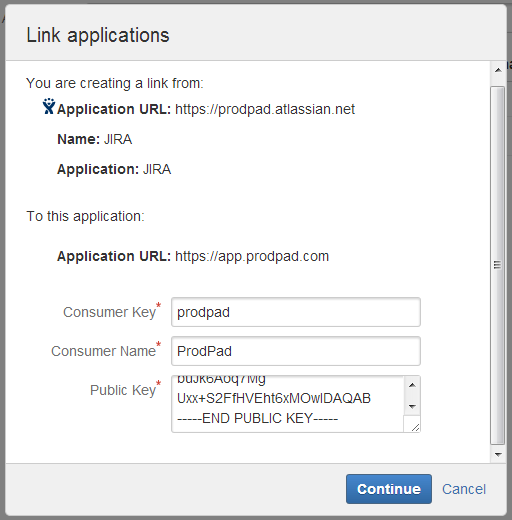
5. Enter Consumer Key (alphanumeric) and a Consumer Name, and paste the RSA public key into the “Public Key” field
6. Click Continue.
You’ve now created an “Application Link” (consumer app) in the JIRA instance with which you can authenticate against.
Code for the Authentication
The next step is to write the code to do the authentication of the user. I’ll show you an outline that is based on using the Zend OAuth classes, but the basic principal should be the same with whatever OAuth library you use.
The first method is to send a call to get the request token which you can then exchange for an access token. Each call using OAuth needs to be signed by the RSA keys and you need to configure the call.
 $private_key = new Zend_Crypt_Rsa_Key_Private([your private key]);
 $public_key = new Zend_Crypt_Rsa_Key_Public([your public key]);
 $config = array(
 'callbackUrl' => 'https://api.example.com/oauth',
 'requestTokenUrl' => 'http://some.jira.host/plugins/servlet/oauth/request-token',
 'authorizeUrl' => 'http://some.jira.host/plugins/servlet/oauth/authorize',
 'accessTokenUrl' => 'http://some.jira.host/plugins/servlet/oauth/access-token',
 'consumerKey' => [secret key],
 'signatureMethod' => 'RSA',
 'rsaPrivateKey' => $private_key,
 'rsaPublicKey' => $public_key,
 );
Getting the config right is important – otherwise you will spend a lot of time banging your head against a brick wall. Let’s go through each setting:
In the case of Zend Oauth classes it needs to convert the strings that are the public & private RSA keys into specific classes in order to be used. This is done in the first two lines of code above.
The config object is then array of information and classes.
The first element, callbackUrl, represents the URL in your system or application that JIRA will send the user back to during the authentication dance.requestTokenUrl is the URL in the JIRA instance that is called to get the request token. The URL begins with the JIRA instance host in this case represented by http://some.jira.host/. This will be distinct for each JIRA instance. The plugins/servlet/oauth/request-token is common to all JIRA instances.authorizeUrl is the URL that the user is sent to in order to authorise access to their account in a JIRA instance. Like requestTokenUrl, the URL begins with the host of the JIRA instance and then plugins/servlet/oauth/authorize. The last part is common across all JIRA installs.accessTokenUrl is the URL that your system will call to convert the request token into an access token once the user has authorised access to their account. Like the requestTokenUrl the URL begins with the host of the JIRA instance and then plugins/servlet/oauth/access-token. This last part is common across all JIRA installs.consumerKey is the alphanumeric string you entered in the Consumer Key field during the setup of the “Application Link” in JIRA.signatureMethod, in this case, tells the Zend OAuth class to use RSA signing instead of the Zend OAuth class default.rsaPrivateKey and rsaPublicKey hold the $private_key and $public_key classes respectively. The Zend OAuth uses these keys to sign the API calls it makes. Note: these keys must match the ones you set up in the “Application Link”
Once you’ve got the config set up, you need to call the method to fetch the request token. In the case of Zend, this is done this way:
 $consumer = new Zend_Oauth_Consumer($config);
 try {
 $token = $consumer->getRequestToken();
 } catch (Zend_Oauth_Exception $e) {
 //some exception handling
 }
 //store the token for the next step (DB, SESSION etc)
 $_SESSION['REQUEST_TOKEN'] = serialize($token);
 $consumer->redirect();
In this snippet of code, the Zend OAuth class calls the requestTokenUrl and returns a token that is then used in the next step of the OAuth process. You’ll need to persist the $token in some manner, whether in the database, the session, or a cache. I suggest database as the JIRA token has a long life.
Once you’ve persisted the $token, you now need to redirect the user to the authorizeUrl so they can grant access to their account. This is done by the method $consumer->redirect(); at the bottom of the snippet.
Assuming the user grants your app access to their account, they are then redirected back to your app to the URL specified in callbackUrl. This end point should be the one that then does the next step of the OAuth dance: exchanging the request token for the access token.
Again, you’ll need to configure the Zend OAuth class using exactly the same method above. Once you’ve setup the config array you can then use the Zend OAuth class to exchange the request token you got in the first step with the access token that will then allow you to make API calls to the user’s account in the JIRA instance.
 $config array(//as per above);
 $consumer = new Zend_Oauth_Consumer($config);
 try {
 $token = $consumer->getAccessToken($_GET,unserialize($_SESSION['REQUEST_TOKEN']);
 } catch(Zend_Oauth_Exception $e) {
 //exception handling
 }
 $_SESSION['ACCESS_TOKEN'] = serialize($token);
In the above code, we are using the getAccessToken method of the Zend OAuth class to exchange the request token we got previously for the access token we need to access the API. Note that the method requires you to pass in the GET parameters as well as the unserialized request token.
What variable that contains the GET variable will depend on what MVC framework you are using (if any).
You will now have an access token that is persisted. This access token can then be used to access the user’s account on the JIRA instance. For further reading, check out using the Zend OAuth to make authenticated calls to APIs.
Hopefully this has saved you some time! If you can see anything I’ve missed or have any suggestions to improve on it, please leave a comment below.
25 thoughts on "Tech Tutorial: OAuth in JIRA"
Comments are closed.


Hi,
I have been trying to make something like what you did for Jira using asp.net but I have not succeeded. How do I make Oauth work using dotnet? any idea? thanks
Hi Kourosh,
I would suggest that you use a .net Oauth library. There are a list here http://oauth.net/code/
The library does need to support RSA signing of the OAuth calls.
The basic process of Oauth is:
1. Get a request token from the Oauth supplier
2. Send the user to the Oauth supplier to authorise access
3. Once the user has authorised access and returned to your side, you need to exchange the request token for an access token
It is the access token that you then use when making calls to the JIRA API.
Hope this helps.
Thanks for the useful tutorial! It helps me understand some corner cases of JIRA+OAuth workflows, although my dev language in Java.
One question is still being open though. What happens when the access token expires?
I guess in this case a user should follow the same initial path: requestToken -> authorize -> exchangeRequestForAccessToken. Will JIRA display “Authorize this app” screen again? Or it will silently redirect him to my callback page (as he has already granted access earlier)?
How can I check if the access token has expired? (any REST API for that)
Thanks in advance,
Alexander
I’ve not run across the Access tokens expiring yet and I’ve not been able to find anything in the docs about the access token expiring.
Even I want to know What happens when OAuth access token expires? Is Jira rest api support refresh token to regenerate the token programatically?
Hi Sonia,
As far as I can see from the documentation and working with the JIRA Oauth, the access token doesn’t expire. I can see anything in the documentation around refreshing the access token.
The user can go to their JIRA dashboard and revoke the access token though.
I want to know if jira rest based api has etag(or similar) support? Does it return 304 response for any response ?
I don’t know. You’ll need to check the JIRA API documents or try Atlassian Answers
Hi Simon,
I thank you for creating this tutorial, I jus have a doubt in creating application link, How do you get the rsa public key ? and how to create one ?
Hi Martin,
You need to generate the RSA certificates yourself using a tool like openssl. For example PHP has this function https://www.php.net/manual/en/function.openssl-pkey-new.php that can be used to generate a private and public key pair.
Thank you for such a nice tutorial, This helped me a lot to setup my application. But every thing was fine when I run from my local machine but when I moved to live server not giving any response from JIRA. Please help me is there any extra things I need to do for live server?
Do you know how to crack jira agile? is been hard to crack, not a lot of information on internet. I guess you know how.
Thanks
Hi Marc, I’m not quite sure what you mean by cracking Jira Agile. Please elaborate!
Hi Simon, I need to make one .NET application that authenticate user in JIRA and after this step is successfully, I need to redirect user to JIRA Dashboard. I need to do this because my application needs to make some check with other applications. I have been implemented JIRA Basic authentication, but, when I try to redirect, is like the session is losted. Do you know something about this?
Hi Leo,
I’m not sure what is going on but with each call to the API or a JIRA page you’ll need to send along the basic auth credentials. There are details on using it here https://developer.atlassian.com/jiradev/jira-apis/jira-rest-apis/jira-rest-api-tutorials/jira-rest-api-example-basic-authentication and details about session authentication here https://developer.atlassian.com/jiradev/jira-apis/jira-rest-apis/jira-rest-api-tutorials/jira-rest-api-example-cookie-based-authentication
Note, I’m not sure you what you are trying to do is the best way. It might be possible to get the information from the REST API anyway.
Hey Simon,
Can you please help me how to do the same oauth settings, but in java?
I’m stuck and cant find anything relevant on the internet.
Hi Nikita,
Atlassian have already published a tutorial for OAuth using Java. You can find it here https://developer.atlassian.com/jiradev/jira-apis/jira-rest-apis/jira-rest-api-tutorials/jira-rest-api-example-oauth-authentication and some additional information on the Java client https://answers.atlassian.com/questions/263719/using-oauth-and-the-jira-java-rest-client
Regards,
Simon
Thanks. Very helpful
is there any way to automate App Link generation, using plugin something.
@vivek I’ve not found a way of automatically creating app links programmatically. I’ve not checked recently so it is possible they’ve changed that but since creating an App Link requires admin permissions it wouldn’t surprise me that this won’t be changing.
I’m not sure if it’s our particular setup in Jira and/or my permissions set, but the Appication Links settings wasn’t under the Add-ons tab, but the Applications tab (which doesn’t appear in your screenshots). Might be worth checking and updating. Otherwise – great article, thanks!
Is there any way to get the user name/email from the access token (or the request token and verifier)?
Hi,
You can have a look at the rest API and see if there is an endpoint for it https://docs.atlassian.com/jira/REST/cloud/ The token doesn’t include any username/email information from what I remember.
Thank you very much. Your words saved me a lot of time.